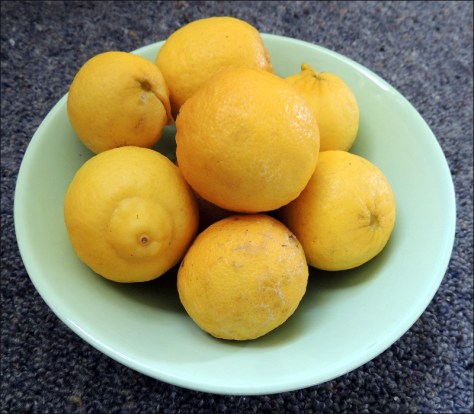
This year has been a great season for citrus, and we currently have more limes than we can eat (or drink, for that matter – thinking of the weekend looming and Margaritas on the horizon). We do grate the zest and freeze the juice in cubes for later, but it’s great to actually use these limes while they’re fresh.
With this in mind, I sourced a Panna Cotta recipe online and have adapted it to incorporate this zingy fruit. And for those who need to know, the dessert is Vegan and Gluten-free and it’s a very acceptable 170 calories per serving. Not bad for a dessert!
3 tablespoons of genuine maple syrup (or your sweetener of choice)
2 teaspoons grated lime zest and 3 tablespoons fresh lime juice (about 1 lime’s worth)
1 bay leaf (I love the flavour of bay in a creamy dessert)
Equipment
Heavy-bottom saucepan
Rubber or silicone spatula
Measuring spoons,
Fine grater
4 small ramekins or jelly moulds (if you wish to turn the panna cottas out, grease them lightly with a plain-tasting oil, e.g., sunflower).
How to make them…
Pour the coconut cream into a saucepan and sprinkle the Jel-it-in on top. Stir until the powder is completely dissolved, then add the bay leaf, the maple syrup, and the lime (zest and juice). Gently bring to the boil, stirring occasionally. Allow it to boil for a minute or two, then remove from the heat and allow to cool a little.
Remove the bay leaf. Pour into the four ramekins and let them cool a little more, then cover and refrigerate. I tend to leave them out of the fridge until they are quite cold, so that when I cover them, they don’t steam up inside and cause condensation on the top of the desserts, but it’s no biggie, either way.
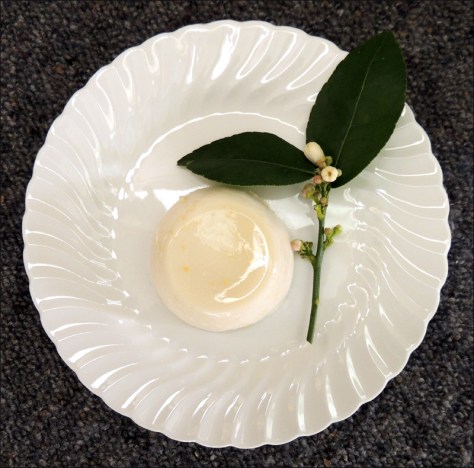
You can serve the Panna Cotta garnished with a slice of lime – very tangy! or with whatever you like, really – chopped nuts, sliced fruit, whatever is around.
The maize along the fenceline is ready for harvest. It’s a visual reminder that summer is over. The days are slow to lighten and early to darken, and the grass is thick with dew when I make my way to the barn in the early morning. The gravel road is dry and whenever a large truck rattles by, great dusty clouds drift across to settle on our solar panels.
It’s been several weeks since I’ve written about South Head. Or about anything, for that matter. It’s been difficult to knuckle down to writing after taking time off over the Christmas/New Year period.
While it’s been a very long and hot summer, we’ve also had a decent amount of rain, which of course has meant that everything has just kept on growing. We’ve created enough gardens here to keep us busy every daytime hour, and for the first time I’ve been wondering if it’s too much. What with the dead-heading, the trimming, the watering, the sowing, the harvesting… not to mention the tying, the squashing (caterpillars), the sampling, the digging and the weeding, always the weeding. (It’s making me exhausted all over again, writing about it.)
Kumeu A & P Show: curious alpaca & disinterested rooster
So… we’ve mostly been home over the weekends slaving away in an attempt to keep everything under control, with a couple of diversionary breaks visiting the local A & P Shows – I like to check out the poultry while Ben looks longingly at the tractors. 🙂
Bounty from the Garden
A selection of home preserves, from left to right: Beetroot; ‘Look Alike’ Lemon Curd; Spicy Tomato Sauce; Zucchini Pickle; Greek Tomato Paste
Since I last blogged we’ve harvested a parade of fresh produce, including grapes, lettuces, carrots, rhubarb, cannellino beans, sweet basil, garlic, cucumbers, peas, beans (green, yellow, purple), main crop potatoes (Agria), beetroot, silver beet, shallots, buttercup squash, tomatoes, butternut pumpkins and LOTS of of zucchini.
A selection of produce, from left to right: white table grapes; cannellino beans; Rhubarb Tarte Tartin
To use up the rhubarb and zucchini I’ve made several Rhubarb Tarte Tartin and a few jars of Lemon Curd Look-Alike, as well as some zucchini pickle. But the neat thing about this year is that we haven’t had too much of one particular vegetable. Everything we’ve grown we’ve either eaten fresh, or I’ve cooked up, preserved, frozen or baked into something.
Tomatoes and Zucchinis
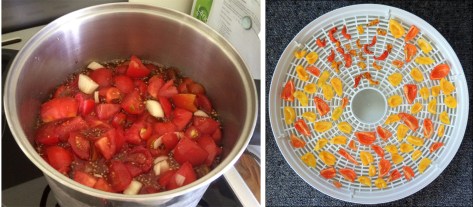
Left to right: tomatoes & onions ready to be cooked for Tomato Relish; red and yellow habanero slices, arranged for drying
The tomatoes have been great, but I picked the last one yesterday and I know I’ll miss having them on hand at meal times. I’m glad that I preserved a good amount this season (Spicy Tomato Sauce, Tomato Relish, Greek Tomato Paste) and that I also froze about a dozen packs of frozen skinless tomato flesh for use during the cooler months.
Recipes
One of the easiest salads to throw together involves mixing chopped tomatoes with a handful of fresh basil (made into a paste), a generous squirt of extra virgin olive oil and finely sliced or diced zucchini or cucumber. I read somewhere that raw zucchini helps you feel ‘more full’ than some of our other salad vegetables, and it’s lovely and light when sliced thinly.
I love cooked zucchini, too. It’s such a versatile vegetable. My favourite quick recipe involves slicing the zucchinis thickly, then sautéing them in a small amount of olive oil along with crushed garlic and sage leaves. The sage leaves turn crispy and add a delightfully fragrant ‘crunch’ to the dish.
Habanero
3 stages of habanero peppers – fresh to dry
Our habanero chiles are ripening as I type, so I’m picking them each day, drying them, then nuking them in a small food processor. We’ll use the chile powder all through the year to jazz up our meals. One of my favourite uses is to sprinkle a liberal amount into cheese toasted sandwiches. Yum!! (It’s very hot, though – not for the chile uninitiated.)
I’ve also raised a pink variety of habanero this year. It’s currently at the flowering stage, so, no fruit, but I can’t wait to see what they look like!
Pears
Autumn pears & the finished product
March in New Zealand is the month for pears and melons. Our old pear tree has produced a good amount of sound fruit this year and yesterday I bottled a small sample in a light syrup. Not sure why I haven’t processed our pears this way before – I usually freeze them for desserts – but I do like to see the finished product in our pantry. And it’s so easy to preserve them using the water-bath method.
I didn’t remember until after I’d finished that you’re supposed to pack the fruit tightly into the jars to avoid having them float to the top of the syrup… oh well… next time!
Melons
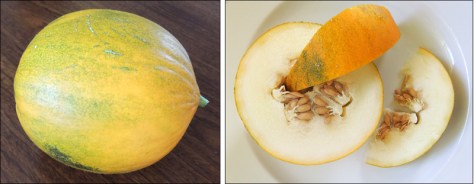
Melon, ‘Collective Farm Woman’ (Cucumis melo)
I sowed seeds for a different melon this year,Collective Farm Woman. It’s a small Ukrainian melon from the Black Sea area, about the size of a honeydew, with pale flesh, the flavour delicately sweet and slightly evocative of bananas.
Bantams!
Our new bantam hens (left) and Charlie
We picked up a trio of Bantams at the recent Helensville A & P Show. They’ve settled in well and having Charlie (the rooster) crow loudly at 5.15 am hasn’t been too much of a shock.
When we first let the bantams join the rest of the flock, they kept to themselves, but they’re now walking around alongside the others. They choose to sleep outside – the rooster up high in a branch of one of the feijoa trees, and the two girls on the fence below. Not sure if they’ll ever voluntarily join the hens in the barn. Perhaps we’ll have to manually move them there in Winter when it gets cold at night.
That reminds me… feijoas! They’re growing plump on the trees. And just now I can see two fat kereru perched up on the yellow guava, eating the first of the golden yellow fruit. The kereru started visiting again a couple of weeks back – I guess our garden is part of their seasonal food cycle, too.
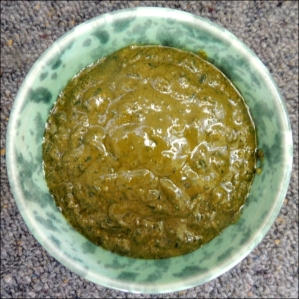
This time of year I have more basil than I know what to do with. And who doesn’t love pesto? This time I decided to make a batch that could also be consumed by the vegans in our family.
Vegan Basil Pesto
Makes approximately 300 grams
109 Calories per tablespoon (15 grams)
I substituted miso paste for the traditional Parmesan cheese. You can use either red or white miso, whichever is your preference. If you like your pesto saltier, add a little more miso to taste.
Throw everything except for the olive oil into a food processor and blend thoroughly. Then with the machine still running, gradually add the olive oil until the required consistency is reached.
If you like your basil chunkier, I’d suggest making it the conventional way, using a pestle and mortar.
Pesto can be kept in the fridge for several weeks. Spoon it into a decent-sized jar and pour on a thin film of olive oil. This will prevent the top discolouring – you can just stir it in each time you use it. It’s pretty yummy though… can’t see my batch lasting long.
You can also freeze small portions of pesto in an ice-cube tray then keep free-flow in your freezer for those winter months when you don’t have the luxury of fresh basil in your garden. It’s great with pasta, or as an addition to just about anything. 🙂
We have so many macadamia nuts that we forget to use them. I’ve been meaning to experiment with making Macadamia Nut Cream for some time – not just for the vegans in the family but also as an alternative to dairy creams. Up until now I kept forgetting about it! (This is very typical of me… bright ideas, best intentions, etc…)
Last night we duly cracked some of our nuts and ended up with about 1 3/4 cups (230 grams) which I soaked overnight in cold water.
I had previously looked up a couple of recipes. The first I decided to adapt is for a regular nut cream, using cashews. Cashews, either alone or combined with almonds, appear to be the most commonly used nuts for nut creams and I can imagine why – they are so creamy and have such a lovely flavour. I’m not sure if our macadamia nuts will be ‘flavoursome’ enough.
The second recipe I’ll try is a recipe for Macadamia Nut Cream Topping. This combines macadamia nuts and coconut milk (among other things). But just now, I’ve tried the first recipe.
For Experiment #1 I replaced the cashews with macadamia nuts.
Ingredients
1 3/4 cups raw macadamia nuts, soaked overnight in water
200 mls water
2 tablespoons real maple syrup
1/2 teaspoon natural vanilla extract
a pinch of sea salt
Process
I nuked all the ingredients in one of our blenders until it was smooth, keeping an eye on the amount of water to add. It was that easy!
The Finished Product
Vanilla Macadamia Cream – the finished product
We’re pretty pleased with the result. The macadamia nut cream has a different texture from dairy cream – you can tell it’s nuts, I guess. It’s noticeably whiter and the taste is creamy and slightly sweet, not overly vanilla or maple syrup. Ben reckons it will taste great on French Toast. And it would be an excellent topping for a sweet pie or shortcake. I could easily eat it like ice-cream.
Calories
This yummy nut cream does come at a price, however.
One tablespoon (approximately 10 grams) equals 42 calories.
A dollop of yummy macadamia nut cream on a dessert spoon.
I’ll post about the second recipe, once we’ve finished this lot! It will be interesting to compare this adapted recipe with one written specifically for macadamia nuts.
or… how to wile away an afternoon instead of working on your current writing project.
The finished product
This week is Te Wiki o Te Reo Maaori, hence my attempt at dual headings. The macrons don’t seem to always display that well, so in same cases I’ve reverted to double vowels.
My Road to Chiles
Tāku Ara ki Ngā Hirikakā
From the day I first tasted a pickled jalapeno on a pizza, I’ve always loved chiles. Very early on I was a member of a chile pepper Usenet newsgroup – this was back in 1994/1995, and a time when the internet as we know it now, was still in its infancy. You weren’t able to browse gazillions of web pages then, nor purchase unusual chile seeds online. A friend sent me some Habanero seeds by snail mail, all the way from the US. Of course, it was probably illegal to do this, but I didn’t think about such things back then, I was just so keen to try them. I nurtured the precious plants under plastic in my (then) Dunedin garden.
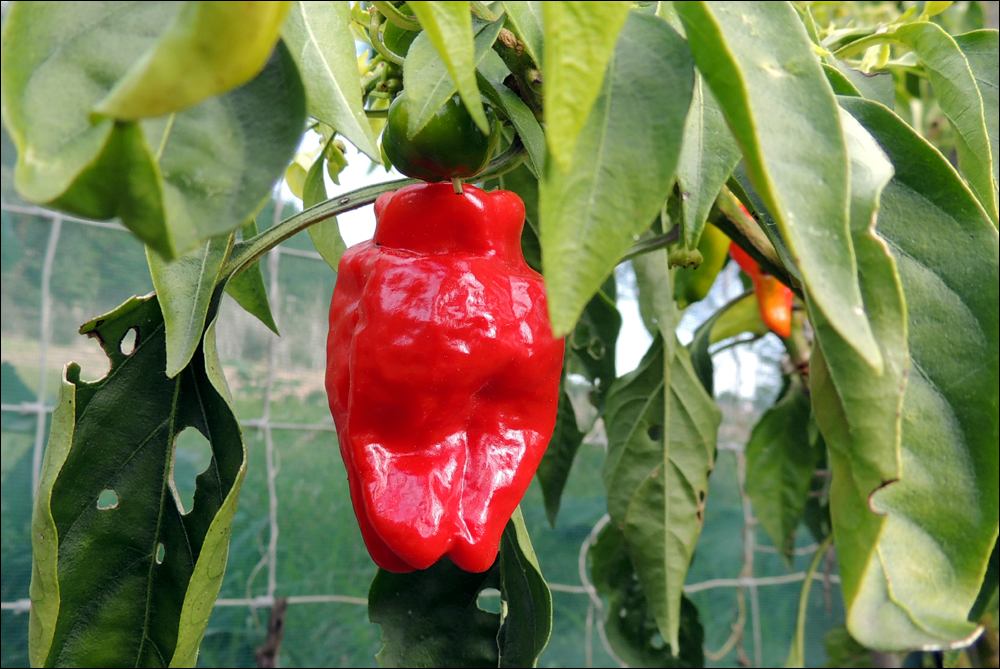
Habanero
Ngā Hirikakā Tino Kakā
The Habanero is still my absolute favourite pepper. In my opinion, it is the most floral and fragrant of them all and I love the heat. I use Habanero everywhere; in curries and pickles, sauces and pastes, even in a Hot Martini! 🙂
A chile plant in July at South Head.
I have grown Habanero, Jalapeno, Serrano and other assorted peppers continuously, since moving to South Head. In fact, my plants are still bearing chiles, out there in the cold, wintry conditions… They are so prolific that by the end of a season, I get somewhat lazy about harvesting them.
Keeping Chiles for Later Use
Hei Rokiroki ngā Hirikakā
My usual practice has been to pick the chiles when they are fully ripe, wash and dry them thoroughly, then freeze them whole. This is an excellent way to store these jewel-like fruit as you can just take one out and slice off a chunk when you need it. The problem is, we can never keep up with eating them and there are bags of them in the freezer – some going back a couple of years. They don’t seem to deteriorate.
This year I thought I’d try preserving some by drying. I’ve seen those neat little jars in home ware shops – the ones with a glass body and a stainless steel screw-top lid with holes. Dried chile is such a beautiful colour, how nice it would be to have our very own flakes or powder, to use as a condiment.
Drying Chiles
Hei Whakamaroke ngā Hirikakā
Chile peppers strung up in the barn.
I wouldn’t say that my technique was completely successful. I diligently harvested a mixture of Habanero and Caribbean Red Habanero, threaded them on strings, and strung them up in both the barn and the hot water cupboard. I kept a few back to use fresh – they were in a rourou on the bench, then forgot about them. Amusingly, a few weeks later, I noticed that these were starting to dry quite well, so I put the rourou into the hot water cupboard as well.
Today I decided it was high time to do something with these peppers. Every time I went to put some linen in the cupboard, I had to push it behind the chiles rattling on their strings. Interestingly, I discovered that the peppers that had dried the best, i.e., had no mouldy-looking discolouration, were actually the ones in the rourou.
The End Product
Te Mea Whakamutunga
I discarded any that didn’t look good enough for my high standards (!) This reduced my stock by at least 50%. I then trimmed the stalks off the others and nuked them in my blender/grinder.
The result is a lovely HOT product – a chili powder/flake, which will be ideal to sprinkle on foods, or to add at the cooking stage – IF YOU DARE. I was using a pastry brush to sweep out the last powdery residue from the grinder – didn’t want to waste any – and inhaled some. Yowsa it was hot, and I coughed for about five minutes.
Recipes
Ngā Tohutaka
Hot Martini
This is the recipe that we use, but I can’t find where I sourced it, unfortunately.
I also found this recipe on the net. It sounds much hotter – perhaps we’ll check it out tonight.
Ingredients
½ habanero pepper
60 mls agave tequila
15 mls dry vermouth
Ice
Instructions
In a cocktail glass muddle the habanero to release some juices. Do not pulverise. Keep the pepper in the glass, or remove it for a (slightly) lesser heat.
Combine over ice the tequila and vermouth. Shake well. Then pour the mix over the muddled habanero.
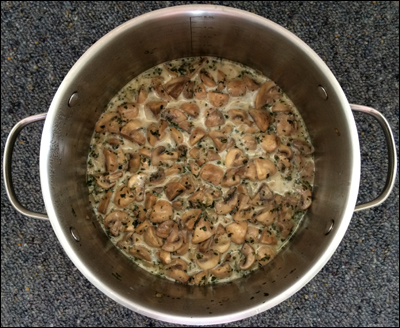
Mushrooms and coconut cream simmering until sauce is reduced to the desired thickness
Method
Using a large pan, saute the onions in 2 tbs coconut oil until golden and transparent. Meanwhile, finely chop the marjoram with the garlic.
When the onion is ready, add the herbs & garlic to the mix and cook through. Remove from the pan and set aside.
Add the remaining 4 tbsp coconut oil to the pan. When hot, throw in the white mushrooms and stir to evenly mix the coconut oil through.
Keeping the heat medium-to-high, and stirring at intervals, cook the mushrooms until their juices are starting to ooze out, then a little more to dry some of them up.
Add the herb & garlic mixture and stir through.
Reduce the juices a little, then pour in the coconut cream. Stir through.
Reduce heat to medium. Stirring regularly, simmer the mushrooms until the coconut cream has reduced to the desire thickness. This would depend on personal taste, i.e. on how much sauce you wanted to serve up with your mushrooms.
Creamy Vegan Mushrooms is ideal for brunch, or as an addition to a main meal. It’s yummy served with lightly toasted Ciabatta.
We’ve picked just about the last of our plums today.
We’ve had so many plums this season, despite the wind that destroyed so many in mid-December. I’ve been making ‘Plum Everything’, including having started a batch of plum wine. But I think there is nothing nicer than a Plum Jam, as it’s so versatile.
This year I decided to invent a spicy version – and it’s turned out extremely well.
For the spicy component I used Habanero that I’d grown last season and had frozen, as our current plant is too small to produce any fruit yet. It’s been a slow season in the garden due to the inclement weather in December.
Four of our home-grown Habanero chilies
Habanero is my absolute favourite chili pepper. It has such an amazing flavour – very fragrant and fruity, as well as the excellent kick it provides (it rates as 100,000 to 350,000 on the Scoville Scale).
This jam is not for the faint-hearted, but it’s definitely worth making. It can be added to sauces or used as a condiment just as it is, or (of course) spread on your toast as a rich and spicy jam.
Our lovely yellow-fleshed, red-skinned plums.
Ingredients
About 5.5 kilos (around 12 lbs) red-skinned plums, stones removed
3 – 4.5 cups white sugar
4 whole Habanero, seeds removed
Method
Chop the plums up roughly and put them in a large preserving pan. Sprinkle the sugar on top and let them sit like this for an hour or so, stirring from time to time to help the sugar dissolve.
Second boiling of the sauce.
Bring this slowly to the boil, stirring at frequent intervals to prevent anything sticking to the base of the pan. Once boiling steadily, maintain the boil for about 10 minutes then turn off the heat and allow to cool to room temperature.
Repeat the above process 3 times (or more if you would like a thicker jam). The main thing to remember is that you have to stir frequently, especially while you are waiting for the fruit to come to the boil, to avoid the fruit sticking to the bottom of the pan and scorching.
If this does happen, don’t panic… transfer the jam to another container without scraping any of the ‘caught’ jam from the bottom of the pan. Wash the pan then carry on with the process. You can stop and start with this recipe easily.
A dollop of spicy jam.
This batch produced about 3 litres of wonderfully rich jam. Actually, I could just eat it directly from the spoon, rather than add it to anything else. 🙂
Notes
Red Plums versus Yellow Plums
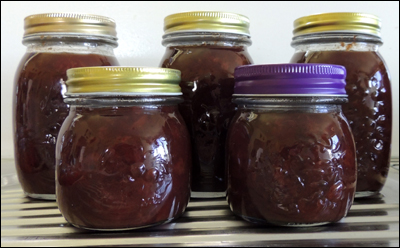
Some of the jars of jam. You can see the lovely dark colour it has developed.
You could use yellow-skinned plums for this recipe, or even greengages, but the red-skinned plums give the jam the most wonderfully rich colour, even using yellow-fleshed plums as I have.
Sugar
I began with 3.5 cups of sugar and then tested the flavour part way through the cooking. It was then that I decided to add an additional .5 of a cup. It’s a matter of personal taste and also, the sugar level in the plums themselves. Also, I like to cut down added sugar where I can, so I tend to start out with a bit less in a recipe such as this, and then add more if I need to.
The above recipe has been adapted from a recipe I found on the Natasha’s Kitchen site.
At this time of year when there are lots of avocados and pears around, this recipe is just perfect.
I came across it in the book, ‘Good Housekeeping Easy to Make Smoothies & Juices (2009), Collins and Brown’, and the result is an incredibly yummy smoothie-dessert.
The texture is velvety, the colour is sublime and the flavour! Well, let’s just say that although the combination of pear and avocado may sound unusual to some, it’s definitely worth trying.
Ingredients
1 small lemon
2 ripe dessert pears
1 small, ripe avocado
Juice of 1 lime
Method
Peel and core the pears.
Cut the avocado in half, remove the stone, and separate the flesh from the skin.
Peel the lemon, removing as much of the white pith as possible, cut into segments and remove any pips.
Put the pears, avocado and lemon into a blender, along with the lime juice. Blend until smooth.
If you’d like to add a ‘zing’ to your smoothie, a dash of something hot would enhance it. Add a dash of ‘Kaitaia Fire‘ or Tabasco sauce, or a tiny piece of habanero chilli to the blend.
In Greek: σπιτικός ντοματοπολτός
Pronounced: spee-tee-KOHS doh-mah-toh-pol-TOHS
A portion of the finished tomato paste, covered with a film of virgin olive oil
I tried two different tomato paste recipes this year, but the Greek version is far superior in flavour. If you have extra tomatoes at this time of the year, it’s definitely worth the time spent in making your own tomato paste when it turns out like this – rich, dark red and extremely flavoursome.
This paste is actually too nice to waste in a recipe as a mere addition to a vegetable or meat sauce. I could easily just eat it all by itself, straight out of the jar (but will restrain myself).
Ingredients
About 2 kilograms of end-of-season overripe tomatoes, peeled
1 red capsicum (red bell) pepper, seeded
1 tablespoons sea salt
Extra virgin olive oil
Freshly chopped and skinned, end-of-season tomatoes
Method
Blend tomatoes and capsicum until smooth
Process tomatoes and pepper in a food mill, processor, or blender until well pulped.
Transfer to a pan and bring to a boil. Boil for 2-3 minutes.
After cooking, drain the tomato mixture over cheesecloth for 12 hours (overnight is good)
Place mixture in a piece of muslin or cheesecloth, and using a strainer, suspend it over a bowl. Leave to drain for 12 hours in the refrigerator to remove all excess liquid.
Transfer mixture to a glass or ceramic baking dish and stir in the salt. Allow the mixture to reach room temperature, then dry in a lukewarm oven (95-100°C) for 15 to 20 minutes.
Remove paste from oven and transfer to sterilised glass jars
Spoon into sterilised glass jars, taking care to avoid creating air pockets, and top with 1/4 inch of extra virgin olive oil (enough to cover completely). Store in the refrigerator until ready to use.
Home-made Greek tomato paste
Notes:
This recipe can be multiplied by increasing all ingredients proportionately.
As the tomato paste is used, top up with more oil to cover, as needed.
These will keep well until next year’s tomato crop is ready!
I only used 1/2 the salt recommended in the original recipe as that seemed plenty. (I tasted the paste after adding the 1 tablespoon of salt.)
There was an additional comment that in Greek homes, this paste is often spread on slices of country bread with a little olive oil, and topped with a crumble of feta cheese. Of course I had to try this with our home-made feta cheese, and it tastes incredible!
This curry could be adapted to use any combination of vegetables, but to my personal taste, is enhanced if potato is included.
We had a surplus of zucchini and had to dispose of some tomato plants that weren’t surviving very well in the heat and dryness of our front porch – hence the green tomatoes. Ripe, red tomatoes would do just as well, as would using tofu in the mix.
The mix of vegetables in the curry is about 1/3 potatoes, 1/3 zucchini and 1/3 green tomatoes.
I served this curry with white Basmati rice and freshly-made Roti.
Finely chop the chilli, measure the spices, crush the garlic and slice the onion evenly, ahead of time. This will enable the curry to be cooked quickly, which is important if you wish to retain the best features of the ingredients.
Potatoes
Sauteed potatoes
Peel and dice about 3 medium sized potatoes and sauté them in a little oil until they are cooked through and have started to develop a crispy golden coating. Remove these from the pan and set aside.
Zucchini
Sautéed zucchini
Do the same with the zucchinis. Slice them into chunky pieces and sauté them in a little hot oil until they are ‘just’ beginning to cook through and have developed a golden colouring. Set these aside, also.
Green Tomatoes
Roughly chopped green tomatoes
Peel and roughly chop the green tomatoes. They can be irregular in size as long as they aren’t too thick – they will soon soften once they are added to the curry.
Method
Wipe out the pan, add a couple of tablespoons of oil and raise the heat. When it is good and hot, add about a tablespoon of black mustard seeds and heat them until they start to pop. Then add the turmeric, cumin, coriander seeds, chilli, ginger and lemon juice to the pan and cook for 1 minute.
Turn the heat down to less than half way and add the sliced onion. Gently cook this until it turns transparent, but don’t over-cook it – you want to still be able to see the slices in the curry. About half way through this cooking process, stir in the crushed garlic so that it has the chance to cook through.
Add the vegetables to the onion and spices and stir through
When the onion is ready, add the potato, zucchini and green tomato. Stir these through carefully, mixing them in with the spices and onion but taking care to keep the pieces intact. Cover the pan with a tight-fitting lid and turn the heat down to low.
Gently cook until the tomatoes have softened, and the zucchini and potatoes are well-heated, stirring from time to time. This should take no more than 20 minutes.
When the curry is cooked through, check for seasoning and serve.