Zucchini Surplus
Last Wednesday was a very warm day at South Head, becoming unbearably hot as the day progressed. After work at 1.00 pm I went outside to check on the state of the garden but didn’t last in the heat for long. I had taken some fresh water and a cup of pullet food to the new Orpingtons and then made my usual rounds.

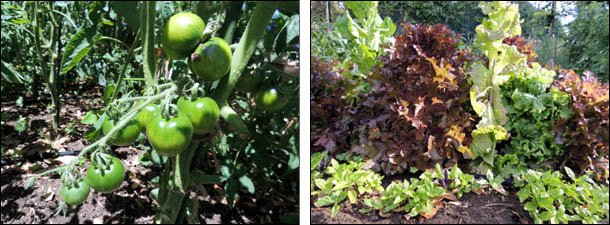
It clearly doesn’t pay to leave zucchinis unchecked for more than a couple of days as I found some monsters vying for space under one of the plants. When I brought them inside I discovered that the two largest weighed 1600 and 1200 grams respectively.

I am definitely getting to the stage of being ‘over’ zucchinis! We have pickled, grated, fried, sauteed and stuffed them. We’ve covered them in garlic, crispy sage, tomatoes, mushrooms, vinegars and spices. I’m getting fussy now and am loath to use them once they’ve grown too fat.

However, having said this, I did come across a really good zucchini pickle recipe which required 1 kg of diced zucchini. I made a batch on Sunday, as I also had some more gherkins to pickle. The other ingredients are chopped onions, turmeric, white vinegar, sugar, water and celery seeds and the result was a particularly yummy, sweet pickle, not unlike a sweet gherkin pickle, but (dare I say it) better.
I’ll definitely make this again and will type up the recipe at some point.

It’s great that our peas are have been coming along nicely, despite the paucity of rain. We’ve had two meals from them so far this week, and (of course) have eaten quite a few straight from the vine. That’s the only trouble with peas – having to resist the temptation to eat them straight from the plant – if you want to have enough left for a meal.
I’m glad now that I sowed another row a couple of weeks back.
Sparrow Zone

Talking of surpluses, we had named the long edge of the garage roof closest to the house ‘Sparrow Riviera’ as there are always so many sparrow families nesting there. From just before dawn until well beyond dusk, the sound of sparrows going about their daily life is a constant. They seem to be continually building new nests and raising new batches of babies.
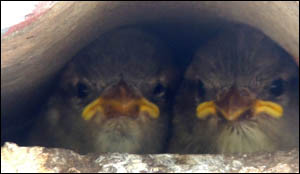
The young ones are learning to fly at the moment and have amused us with their antics. We know that if we see a fledgling flying towards us, we need to move aside or duck, as they haven’t quite honed up their skills sufficiently to avoid an unexpected obstacle. They fly into windows and fall to the grass, temporarily stunned, or chirp plaintively from the roof, hoping a parent will come by and feed them.

If Molly has caught any of these new flyers, she must have devoured them completely as we haven’t seen any partially-eaten bodies.
Beetles and Moths
I’m always on the look-out for new bugs to identify.

Last Tuesday evening, when I went to take note of the solar power readings (I keep them on a spread-sheet) there was a Burnt Pine Longhorn Beetle (Arhopalus ferus) sitting on our back porch.

I’ve also managed to photograph a couple of different moths – the tiny (15 mm wing-span) Apple Looper Moth (Phrissogonus laticostatus) and the endemic Cabbage Tree moth (Epiphryne verriculata)
Coffee Soap
For some time I’ve been meaning to mix up a new batch of soap. In particular, some soap suitable for our vegans. I finally found the time to doing this on Sunday.
I had already decided to try a Coffee Soap recipe that I’d come across thanks to being on David Fisher’s Candle and Soap-making mailing list. It seemed like this would be a nice change from the usual scented soaps I’ve experimented with, and I’d also read that coffee-scented soap was useful for cooks, as it helped remove the odours of garlic and fish.
Soap isn’t that difficult to make and and can either be made traditionally, using different fats (i.e. beef or mutton), or by using vegetable oils. The only ingredient you need to take care with when making soap, is lye, as this can be a very volatile and dangerous item to work with. Special attention must be paid when adding the lye to the water, and one should always don protective glasses and gloves, and work in an area with good air circulation. Lye is critical for soap making and soap cannot be made without it. It reacts with the oils to form soap and glycerin.

Soaps I’ve made in the past are rosemary, cranberry/oatmeal, lavender, spicy mandarin and lemon grass/kaffir lime. One batch makes quite a few individual soaps so I tend not to make soap too often.
Home-made soap has no preservatives and supposedly doesn’t last as long as commercial soaps, but some of our soaps are around 2-years old and still haven’t deteriorated noticeably. I keep them in a dark drawer.
Basic Soap-Making Process
The soap-making process involves the careful measuring of the proportions of all the ingredients. My basic vegan soap recipe includes water, canola oil, caster oil, olive oil, coconut oil and lye. There are very good calculators online that help you work out the exact proportion of lye to use, based on the fats/oils in your recipe.

The powdered lye is added carefully to the cold water (in this case to the coffee). Adding lye to water causes a chemical reaction that generates a great deal of heat, so this has to then cool down. Care must be taken not to inhale any fumes, too, and to avoid being burnt by the lye or the lye/water mixture.
While the lye/water mixture is cooling down, the oils are brought to within the 10 degrees of the same heat – you are aiming for between 90 and 110 F for both mixtures. Once they have reached this range, the lye/water mixture can be carefully stirred into the oils.
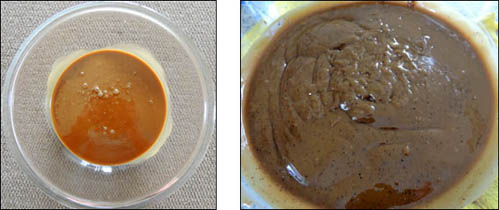
The next step involves using a stick blender to stir the mixture until it reaches a thin pudding or gravy-like consistency (known as having ‘traced’). When it’s ready, the drippings will leave a pattern on the surface if you lift the blender out of the mixture. You could also use a whisk or a regular egg-beater, but thank goodness for technology as this would take ages!
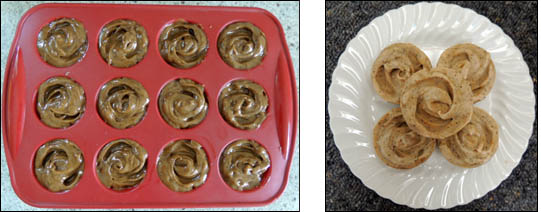
I’ve been using a muffin tray as a soap mould as it’s easy to pop them out once they have set. Soaps made using this method have to be left for two days, after which they should be ready for turning out of their moulds or cutting into blocks, etc. The finished product should then be left to ‘cure’ for 3-4 weeks before use.
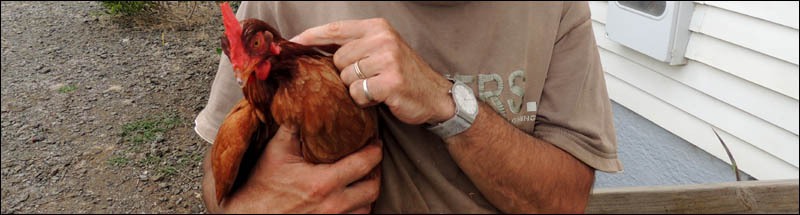
Hen Update
The four new pullets have settled in well. We are thinking of opening the ‘door’ between the two parts of the run in about a week’s time.
Our red shavers are as mischievous as ever. They will slip inside the back door if we leave it open, making straight for Molly’s cat-food or milk. Once caught, they will meekly let us carry them back outside. Lottie and Lulu are the most common culprits.
Actually, it can be very annoying. Imagine a hot day with all the doors and windows open – I’ll be working away at some project and will hear the ‘tap, tap, tap’ of beak on plate, and will have to stop what I’m doing to chase the little biddy out.